Sunday Bake | Ombre Petal Birthday Cake

30 Mar 2014


This week was Craig's Birthday which meant that I had a birthday cake to concoct! I've seen this 'petal' technique ALL over Pinterest recently and I just think it looks so cool! I love the effect it gives, and I love abit of ombre too so I knew I wanted to include that element as well. Mustard Yellow is Craig's favourite colour and that was the original idea, but trying to make mustard is REALLY hard! Mine turned out wayy too orange, but its the thought that counts right? I really want to make this again in a Mint Green (my favourite colour!) or a Sea Blue!

The actual cake is a chocolate and vanilla marble, which as usual I over-swirled so the marbling isn't very defined - darn it! All of the icing is a Vanilla Frosting which I just tinted with food colouring to create the ombre effect. As this cake is all about the decoration I'm not going to write a cake recipe, as you can really do any recipe and flavour that you like! But I will give a recipe and some tips on creating the petal effect.


I actually attempted this technique last year and I failed epicly because my frosting was way too runny! It needs to be quite stiff so that it actually holds its shape on the side of the cake. So I decided to use the Vanilla Cupcake Frosting recipe from the Hummingbird Bakery book Cake Days as I know that it creates a really stiff mixture. I also had to double the original quantity as this technique uses up a lot of frosting! This is definitely a technique to use for an occasion as it's definitely not light on the calories! Oops!

Vanilla Frosting:

1kg Icing Sugar (ouch!)
320g Unsalted Butter, Softened
100ml Whole Milk
1/2tsp Vanilla Essence

(Sidenote! 1kg of Icing Sugar is a hella lot of Icing, so when whisking you may end up coating yourself in the stuff! I actually made mine in two batches (500g of Icing Sugar in each batch) to make it easier for myself, but its completely up to you!)

1. Whisk the icing sugar with the butter until fully combined and sandy in consistency.
2. Add the vanilla essence to the milk and pour into the butter and icing sugar while mixing slowly.
3. Then increase your speed and using a wooden spoon mix the frosting until light and fluffy.

Now if you want to colour your frosting, separate the frosting into bowls depending on how many different colours you want to create and add food colouring. To create the above, I put half the frosting into one bowl and then halfed the remaining half and put that frosting into two bowls. Was that confusing enough?

Essentially I had three bowls of icing, one with half the original frosting as I needed more of the white icing to fill and crumb coat the cake. The other two bowls I tinted with food colouring, ensuring that one bowl was darker than the other.

Next is assembly! First, I filled the cake with some of the white vanilla frosting and then crumb coated the entire cake and put it in the fridge for about 20 minutes. This is to make it easier for you when piping as you'll have a smooth, flat surface to work with.

Now onto the piping! It really is so simple, I promise. Starting at the bottom pipe two circles with the white frosting, above that two circles of the yellow frosting and above that two circles of the 'mustard' frosting. Then using a spatula spread each circle to the right making sure to clean the spatula inbetween different colours. You then need to do exactly the same, slightly to the right of the original circle. If you want to create the ombre effect pipe the first line as normal, then on the second line pipe one circle of the darkest colour frosting at the bottom and work up as normal for that line. Then on the next line pipe two circles of the darkest colour frosting at the bottom and again work up as normal. Repeat that all the way around the cake and you will see the pretty pattern appear.

I hope you like the cake anyway and I hope this all makes sense, its actually quite hard to write down but is super easy to create! Let me know if you have any questions :)

Aimée
Xxxx
read more " Sunday Bake | Ombre Petal Birthday Cake "

Weekly Highlights. #17

29 Mar 2014

L-R: Birthday Cake, Photostrips, Birthday Selfie, Monmouth Coffee, Birthday Boy, Monmouth, Marble Cakes, Moroccan Chicken Tagine, Aubergine Amazing-ness, Cake!, Les Mis.  
This week has been one of my best weeks in a very long time. :) It was my favourite boys Birthday, I went to the theatre and most importantly I had a SUCCESSFUL job interview! All of the excitement - it was hard to choose three highlights!

But here they are:

1. As an avid baker, Birthday Cakes are simultaneously really exciting to create and really stressful as the perfectionist inside me comes to play. I was pretty happy with Craig's cake though. I attempted the 'petal technique' which is ALL over Pinterest and it actually worked! I've got a full post about it tomorrow, so check back if you're interested :)

2. For Craig's birthday dinner me and our best friend Joe made a literally amazing feast. Though I can't take full credit, as in reality I was Joe's sous chef! We made a morrocan chicken tagine with rice and an aubergine side dish. The pictures above really don't do it all justice which is rather annoying, becuase it was soo tasty. The aubergine was so soft, and the chicken literally fell off the bone. So damn good. 

3. Finally and most importantly for me, is something I haven't really spoken about at all on the blog but for some time now I have been out of work. But this week after many many interviews I've finally been given the one yes that I needed and I start work next week in an industry which really excites me! YAY. I am literally beyond happy. :) 

So thats my week, I hope you've all had a delightful week too and are now enjoying the beaut weather this weekend!

Aimée
Xxxx
read more " Weekly Highlights. #17 "

Review | La Roche-Posay Effaclar Duo+

28 Mar 2014


Back in February I posted a review on the original Effaclar Duo and deigned it holy grail status. Since then I have been road testing the new and improved Effaclar Duo+* and unsurprisingly I'm still in love. So whats changed?

The original Effaclar Duo treated my spots, blemishes and clogged pores with ease. My skin was visibly brighter and any spots were zapped immediately. So why fix what isn't broken right?

Well, I'm sure I'm not alone when I say that spots and blemishes leave us with red marks and scarring long after the spot has actually cleared up. My skin in particular is SUCH a slow healer so any blemish or spot will stay with me for a long time after. This is where the Effaclar Duo+ comes into play. It contains a new ingredient which rebuilds the skins surface ensuring you aren't left with any of these marks. Amazing news for anyone with skin like me!

It literally is a skin saviour; helping to prevent spots appearing in the first place, targeting them straight away if they do arrive and cleaning up after them so that no scarring is left behind.

I find that the texture of the Duo+ is slightly thicker than the original Duo but it still sinks in really well and leaves my skin feeling super moisturised. You can use the Duo+ with or without a moisturiser over the top, its completely up to you. I find that in the morning it really helps to prime my skin before I apply my make-up and so I only use the Duo+. But in the evening, I also use my Emma Hardie AM/PM Treatment Moisturiser.

All in all, the Duo+ is still HG status for me.

Aimée
Xxxx

*This product was sent to me as a PR sample for review consideration. Despite this my review remains 100% honest and true to my own opinion.
read more " Review | La Roche-Posay Effaclar Duo+ "

A Day at Camber Sands.

23 Mar 2014


So this week me and my sister Katie decided to take advantage of the sunny weather and head down to Camber Sands. We used to go to this beach a lot when we were kids and it holds a lot of good memories for us. It actually turned out to be a SUPER windy day, which did make it a little chilly. It was so windy the sand looked like smoke billowing across the beach. But in true British style we traveled down anyway, and even had a picnic sat on the beach. Call us crazy maybe, but we enjoyed it! We also had farr too much fun taking jumping pictures, and I attempted to be arty farty taking pictures of the sea. Deep breath, here comes a lot of pictures!


You may notice throughout these pictures that the above is the only one where you can actually see my face! This is because I have a fringe, and they are NOT a good look in ridiculously windy weather let me tell you. I generally look like I'm in an 80's music video, which although I'm sure was a great look then, is not one I want to sport in every day life. We had such a good day though, if you're ever nearby I urge you to go and meander along the beach. :)

Aimée
Xxxx
read more " A Day at Camber Sands. "

Weekly Highlights. #16

22 Mar 2014

L-R: Me and the Boy, Afternoon Tea in Battle, Katie at tea, Saturday morning with the Boy, Homemade Pizza, Nespresso Latte, Deciding on outfits, Prawn Salad, London in the sun, Bunch of Carrots Lush Bubble Bar, Garden in the sun, Camber Sands, Me, Chips! 
This week the sun has been out in full force and putting a smile on my face. I even managed to escape to the beach for the day! Lets hope its here to stay because I am definitely bored of the cold now!!

My three highlights are:

1. This week Craig bought a Nespresso machine and I've been all over the coffee. He also has a milk frother with it, which makes amazing lattes! Win! I might need to go on a coffee detox soon though...!

2. I've had some really yummy food this week - that counts as a highlight right? From prawn salads, home-made pizzas and a super yummy cream tea! I'm a foodie at heart so I can't not talk about the food in my life :). 

3. Finally, yesterday me and Katie drove to Camber Sands, a beach that we used to spend alot of our childhood summers at. It was SO windy though, and we left literally covered in sand!! I even had to take off my tights in the car to get the sand out of them! haha It was so lovely to go back there though, and it was a beautifully sunny day. We had the full British experience and had chips in a seafront cafe, with copious amounts of salt and vinegar! We also went to the town of Battle, and went to a gorgeous medieval looking café. I had a cream tea and Katie had tea and crumpets - all hand-made and super tasty! A lovely day out all in all <3 .="" nbsp="" p="">

I hope you've all had a lovely week! :)

Aimée
Xxxx
read more " Weekly Highlights. #16 "

Easter Lush Treats.

21 Mar 2014


When I'm looking for a bath time treat, Lush will never fail to help me out. I struggle to walk past a Lush without popping in and nearly always leave a little lighter in the pocket. Now as their Easter range has been released I had more than justified a trip in.

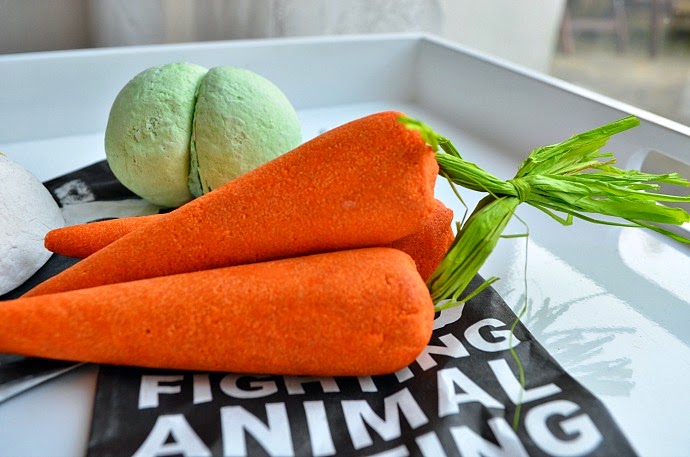
I was really in the mood for a bubble bath last week so I picked up three of their Easter themed Bubble Bars; The Bunny, Green Bubbleroon and Bunch of Carrots. All three drew me in mainly through their super cute aesthetics but as like all Lush products they all smell AMAZING too.

The Bunny shares the same scent as the Creamy Candy Bubble Bar, a super yummy vanilla and has skin softening shea butter and coconut oil to pamper your skin. The Bunny however is also filled with blue cornflower petals to make your bath really pretty!

The Green Bubbleroon looks rather like a bum in the picture above! Oops! But, I promise it does look like a macaron in real life! Grass is literally one of my favourite smells ever and I loveeee me some macaron's so I couldn't leave without this! The two halves are joined together by coconut oil and shea butter which leaves your skin feeling ridiculously soft and your bath turns a beautiful green colour. I can't wait to use this one!

Finally, the Bunch of Carrots is just darn awesome. There was no way I was leaving this in the shop! The carrots probably have the faintest scent out of the three bars I bought, but it is a lovely tropical and fruity scent. I love that the carrots are reusable too, I'm hoping I'll be able to get quite a few baths out of this! But lets face it, I bought them because they're carrots. No lie.

Have you tried any of the Easter range at Lush? Also, taking the photos of these Bubble Bars gave me Reason No.5463 for wanting a Bunny Rabbit, because HOW CUTE would it have looked next to the Bunch of Carrots?!?

Aimée
Xxxx
read more " Easter Lush Treats. "

Review | Revlon Colourburst Matte Balm in Striking

18 Mar 2014


Its official. I've found my go-to Spring lip. Initially I wasn't going to buy any of the Revlon Colourburst Matte Balm's as to be honest I already have lots of balms from different brands in my collection. But, a few good reviews here and there and I was sucked in. I picked up the shade Striking and I'm literally in love with it.

Its a beautiful red, that has slight orange undertones on me. Its quite a bold colour, but is definitely buildable to create a subtler or stronger look depending on your preference. Its such a great colour I really think it would suit most skintones!

Despite being a matte finish the formula is super moisturising as the balms are made up of a Triple Butter Complex - shea, mango and coconut butters. I've found that the balm lasts really well throughout the day, and I only had to reapply once or twice after eating! The balms also have a (really) slight peppermint scent which is great for the mint lovers out there, myself included.

I think its such a perfect shade for spring/summer, and they're great to use on the go. Can you tell I love it? ;) Now my only question is which shade I should try next! Any suggestions?

Aimée
Xxxx
read more " Review | Revlon Colourburst Matte Balm in Striking "